Posted by Tracey on Sep 6th 2025
Don’t Let a Leaky Toilet Ruin Your Trip: RV Seal Replacement 101
How to Replace a Failing RV Toilet Seal (Without Losing Your Sanity… or Your Nose)
If your RV bathroom has started smelling like something crawled in and lost the battle, don’t panic. Odds are, your toilet seal is failing. Good news: this is one of the easier DIY fixes out there. Bad news: yes, you’ll have to stick your hands way closer to the danger zone than you’d prefer.
Let’s walk through how to replace that failing RV toilet seal—and keep your bathroom smelling more like “fresh pine” and less like “oh no, what died in here?”
Why Bother Fixing It?
The toilet seal is like the bouncer at a nightclub—it keeps the unwanted (odors, leaks, grossness) out and the good stuff (water) in. When it fails, you get:
-
Water that mysteriously drains from your bowl overnight.
-
Odors that could clear a room faster than chili cookoff night.
-
Little puddles around the base (and nobody likes mystery puddles).
(Camping World explains this well).
Flush Ball Seal vs. Flange Seal: Who’s the Culprit?
-
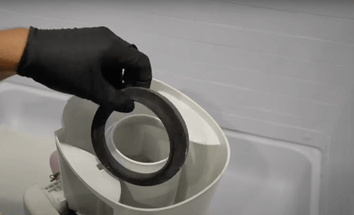
Flush Ball Seal – If water won’t stay in the bowl or smells keep sneaking through, this little rubber ring is guilty. (RV Love has a great DIY guide).
-
Flange Seal (a.k.a. floor seal) – If you’ve got water leaking at the base of your toilet, this is your guy. (Camping World’s step-by-step).
How to Replace a Flush Ball Seal
What you’ll need:
-
A replacement seal (check your model: e.g. Dometic 385311658 for 300/310/320, Thetford 34120 for Aqua-Magic V/VI)
-
Gloves (trust me, don’t skip these)
-
A wrench
-
Silicone plumber’s grease
-
A sense of humor (optional but highly recommended)
Steps:
-
Turn off the water. Unless you enjoy surprise showers of toilet water.
-
Drain the bowl. Hit the flush pedal until it’s bone dry.
-
Remove screws behind the bowl. Keep track of washers unless you enjoy puzzles.
-
Lift the bowl off like you’re unveiling a fancy dish at a restaurant—except, you know, less appetizing.
-
Pop out the old seal (it’s probably stiff, cracked, or just plain gross).
-
Clean the area—because now’s your one chance to deal with the gunk hiding under there.
-
Lubricate and install the new seal. Evenly, like you’re buttering toast.
-
Reassemble and test. Fill with water, cross your fingers, and celebrate with a very cautious sit.
How to Replace a Flange (Floor) Seal
This one’s for when your toilet is leaking at the base.
-
Empty your black tank first (please, for your own safety).
-
Disconnect water and remove the toilet bolts.
-
Lift the whole throne off the floor—bonus points if you make a dramatic grunt while doing it.
-
Toss the old seal, clean the flange, and drop in the new one.
-
Reinstall the toilet and tighten bolts just enough. Over-tightening = cracked porcelain = new toilet shopping trip.
- Thetford Flange seals can be found here, and Dometic Flange Seals can be found here
Pro tip: Skip wax seals (they’re for houses, not bouncing RVs). Use a proper foam RV seal.
Pro Tips to Keep Things Fresh
-
Take photos before disassembly. Future-you will thank past-you.
-
Label your hardware so you don’t end up with “mystery screws” at the end.
-
Don’t overtighten bolts unless you want to learn the phrase “catastrophic porcelain failure.”
-
Lubricate seals occasionally with plumber’s grease to extend their life (and your nose’s happiness).
Final Flush
Replacing your RV toilet seal isn’t glamorous—but it’s a whole lot better than living with leaks, smells, or ghost water disappearing from your bowl. With a little effort (and maybe a clothespin on your nose), you’ll have your bathroom back in tip-top shape.
Remember: every RV has its throne. Treat yours well, and the road will smell a whole lot sweeter.

